Clematis Tudor
Nilalaman:
Ang pagkakaiba-iba ng clematis Tudor ay pinalaki salamat sa mga breeders mula sa Alemanya. Natanggap ito noong 2009. Ang kulturang ito ay mayroong malalaking bulaklak, at maaga sa mga tuntunin ng oras ng pamumulaklak. Mahaba at sagana ang pamumulaklak ni Tudor. Tulad ng para sa mga kinakailangan para sa lumalaking, ang iba't-ibang ito ay hindi maaaring tawaging masyadong kakatwa sa teknolohiyang pang-agrikultura. Bilang karagdagan, tinitiis ng Tudor ang mababang temperatura ng maayos.
Clematis Tudor: mga larawan
Clematis Tudor: pagkakaiba-iba ng paglalarawan
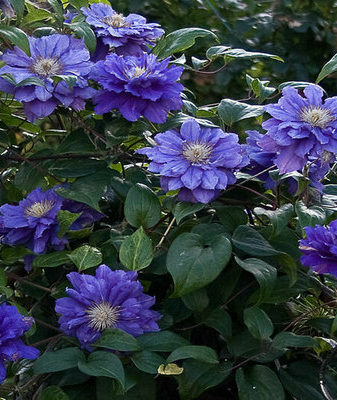
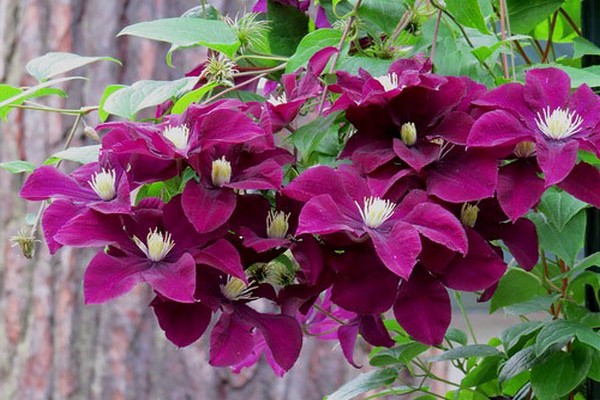
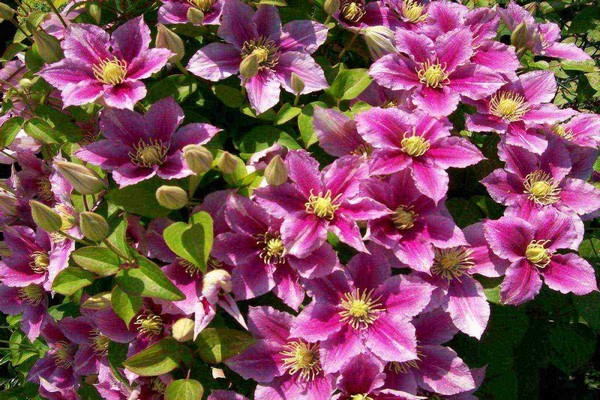
Ang Clematis ng iba't ibang Tudor ay namumulaklak sa malalaking bulaklak. Ang iba't ibang clematis ay nakakuha ng pangalan nito bilang paggalang sa dinastiya ng mga hari mula sa Inglatera. Ang hitsura ng halaman na ito ay mukhang kaakit-akit at mayaman. Ang mga inflorescence ay ipininta sa isang maputlang lilang tono, ang gitnang bahagi ng mga petals ay may guhitan ng lila, paayon na hugis. Ang mga corollas sa kanilang diameter ay maaaring umabot mula walo hanggang labindalawang sentimetro. Ang bawat bulaklak ay naglalaman ng anim na petals. Sa gitnang bahagi ay may mga lilang anther, na nasa mga puting binti.
Ang palumpong mismo ay hindi masyadong malapad, siksik sa laki, hindi masyadong matangkad. Ang nasabing clematis ay maaaring lumaki sa taas na hindi hihigit sa isa at kalahati hanggang dalawang metro. Ang pamumulaklak ay nangyayari dalawang beses sa isang panahon. Ang unang pamumulaklak ay nangyayari sa Mayo - Hunyo, at ang pangalawa sa Hulyo - Agosto. Ang mga dahon ay may isang maputlang berdeng kulay, ang istraktura ng dahon ng plato ay may isang maliit na bagay. Madaling mapaglabanan ng Tudor ang mababang temperatura, pababa sa -35 degree.
Tulad ng para sa pruning group, ang iba't ibang Tudor clematis ay kabilang sa pangalawa. Ang unang pagkakataon na ang halaman ay namumulaklak nang marangal sa tagsibol sa mga tangkay ng nakaraang taon. Ang susunod na pamumulaklak ay nangyayari sa kalagitnaan ng Agosto matapos maisagawa ang pruning. Ang halaman ay namumulaklak sa pangalawang pagkakataon na sa mga shoot ng kasalukuyang panahon. Sa taglagas, kinakailangan na gupitin nang gaanong ang mga halaman, halos isang metro mula sa ibabaw ng lupa.
Clematis Tudor: mga larawan
Paano maayos na magtanim at pangalagaan si Tudor
Upang ang iyong mga bulaklak ay pakiramdam mabuti at mangyaring sa iyo ang mga resulta sa bawat taon, pagkatapos kapag pagtatanim pinakamahusay na magbigay ng kagustuhan sa mga lugar na mahusay na protektado mula sa pag-agos ng hangin, at mayroon ding sapat na dami ng sikat ng araw sa buong araw. Ang root system ng clematis ay hindi dapat magpainit, kaya't ang lugar ng bilog ng puno ng kahoy ay dapat ilagay sa isang may shade area. Mahusay na maglagay ng isang mulching layer doon, at lilim din ito sa tulong ng iba pang mga pandekorasyon na halaman na nakatanim sa kapitbahayan. Ang Clematis ay hindi masyadong positibo tungkol sa nadagdagan na antas ng kaasiman sa lupa. Ang antas ng tubig sa ilalim ng lupa ay hindi dapat matatagpuan ng napakalapit sa ibabaw, dahil ang tubig sa root zone ay hindi dapat tumila.
Upang maging matagumpay ang pagtatanim ng iyong clematis, dapat mong sundin ang isang tiyak na algorithm ng mga aksyon:
- Ang butas ng pagtatanim para sa kulturang ito ay nahukay na medyo malaki, dapat ay mga animnapung sentimetro ang lapad. Ang lalim ng butas ay dapat na pareho ang laki.
- Kung ang lupa ay may napakahirap na istraktura, ang isang layer ng paagusan na labinlimang sentimetro ay dapat na inilatag sa ilalim ng butas ng pagtatanim. Bilang karagdagan, upang mabigyan ang kaluwagan at gaan ng lupa, kailangan mong magdagdag ng pit.
- Para sa layer ng paagusan, maaari mong gamitin ang pinalawak na luad, graba.
- Upang maipapataba ang lupa sa site, kailangan mong magdagdag ng mga ahente ng deoxidizing, pati na rin ng karagdagang nutrisyon. Upang magawa ito, maaari mong gamitin ang pataba, pagkain sa buto, maayos na pag-aabono, pati na rin mga dressing ng mineral sa complex.
- Sa tuktok ng alisan ng tubig, isang materyal na hindi habi ay dapat na inilatag.Dapat itong pumasa nang maayos sa tubig. Para sa mga layuning ito, gumagana nang maayos ang coconut fiber.
- Pagkatapos nito, kailangan mong ibuhos nang maayos ang lupa sa butas ng pagtatanim. Pagkatapos ang lupa ay dapat na leveled at tamped.
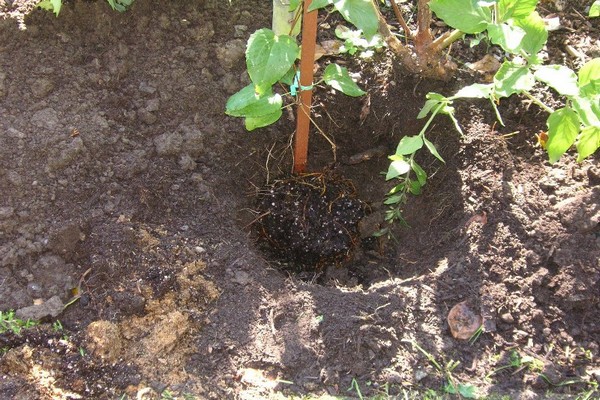
- Sa gitna, kailangan mong gumawa ng isang hindi masyadong malaki na butas, na magiging pantay ang laki sa mga rhizome ng iyong materyal na pagtatanim.
- Kung ang halaman ay may bukas na sistema ng ugat, kung gayon ang isang maliit na tambak ay dapat gawin sa ilalim ng butas, isang punla ang inilalagay sa ibabaw nito, at ang root system ay ituwid.
- Sa panahon ng pagtatanim, ang root kwelyo ay dapat pumunta walong sa sampung sentimetro sa ilalim ng lupa. Ginagawa ito kung ang mga stems ay may isang lignified texture. Kung ang mga sanga ay may kulay na berde, kung gayon hindi sila dapat alisin sa ilalim ng lupa.
- Susunod, kailangan mong punan ang lupa at tamp. Mga sampung sentimetro mula sa punla, kailangan mong gumawa ng isang maliit na uka.
- Sa tabi ng isang batang halaman, kailangan mong maglagay ng isang maaasahang suporta. Dapat itong tumayo nang matatag at matatag, hindi ito dapat matakot sa pag-agos ng hangin, dahil ang mga pag-shoot ng kulturang ito ay mas mahina.
- Pagkatapos ay kailangan mong lubusan na matubigan ang lugar ng puno ng bilog ng halaman na may lata ng pagtutubig.
- Sa tuktok kailangan mong maglagay ng isang mulching layer. Mahusay na gumagana ang sup o coconut fiber para sa mga hangaring ito.
- Sa gilid kung saan nagniningning ang araw, mag-install ng isang screen na mapoprotektahan ang iyong mga pagtatanim mula sa labis na araw nang halos isang buwan at kalahati. Para sa mga hangaring ito, maaari kang gumamit ng puting telang hindi hinabi.
Dagdag dito, hindi masyadong mahirap pangalagaan ang isang nakatanim na halaman. Panaka-nakang, ang clematis ay dapat na natubigan habang ang lupa ay natuyo. Ang root system ay hindi dapat kulang sa tubig.
Sa taglagas, ang isang batang halaman ay dapat i-cut sa antas ng ibabaw ng lupa. Sa kasong ito, kailangan mong iwanan ang mga malalakas na bato sa dami ng maraming piraso. Pagkatapos nito, kailangan mong takpan ang natitirang bahagi ng halaman ng mga nahulog na dahon at isang malts layer.
Napapansin na ang pamumulaklak ng Tudor ay nangyayari kapag ang halaman ay tatlong taong gulang. Pagkatapos nito, kailangan itong i-cut sa isang espesyal na paraan. Ang mga puno ng ubas ay kailangang paikliin nang kaunti sa taglagas. Ang taas ay dapat na iwanang halos isang metro mula sa ibabaw ng lupa. Pagkatapos nito, ang mga halaman ay insulated ng mga sanga ng pustura, spunbond. Para sa parehong layunin, maaari mong gamitin ang frame lutrasil. Sa pangalawang taon ng buhay ng halaman, kinakailangang magdagdag ng mga nutrisyon. Ginagawa ito mula Abril hanggang sa katapusan ng tag-init.
Sa taglagas, ang lugar ng trunk circle ay dapat na sakop ng isang layer ng malts. Para sa hangaring ito, maaari mong gamitin ang humus, peat, nahulog na mga dahon. Matapos maputol ang mga pilikmata noong Oktubre, kailangan mong alisin ang mga ito mula sa istraktura ng suporta at gamitin ang mga ito bilang pagkakabukod. Ang materyal na sumasaklaw ay maaaring kailanganin sa temperatura ng -4 degree. Kung minsan ay natitiklop ang mga ubas, sa gayon bumubuo ng isang singsing. Ngunit may panganib na mabuo ang mga sugat sa ibabaw ng cortex. Mahusay na ilagay lamang ang mga ubas sa isang mulching layer, pustura na mga sanga o koniperus na magkalat.

Clematis Tudor: mga larawan
Bago maglatag ng isang layer ng malts sa lugar ng clematis trunk circle, kailangan mong maubusan ng tubig ang mga halaman. Ang Clematis ay dapat magkaroon ng isang supply ng tubig para sa taglamig.
Ito ay nagkakahalaga ng pagpuna na ang mulching layer ay dapat gawin mas makapal kaysa sa tagsibol o tag-init. Dapat itong hindi bababa sa labinlimang sentimetro. Hindi ito magiging labis kung gamutin mo ang mga halaman sa pamamagitan ng patubig para sa mga layunin ng pag-iwas. Halimbawa, maaari mong gamitin ang gamot na Fundazol. Ang pamamaraang ito ay ginagawa bago itabi ang pantakip na materyal para sa pagtatanim.
Tulad ng para sa pagpaparami ng clematis Tudor, ang pamamaraang ito ay maaaring isagawa sa iba't ibang paraan. Ang Tudor shrub ay maaaring hatiin, ang clematis ay maaaring ipalaganap gamit ang mga pinagputulan o layering. Tulad ng para sa pagbubungkal ng punla ng clematis ng pamamaraan ng binhi, ito ay nagkakahalaga ng pag-alam na ang mga katangian ng pagkakaiba-iba ay hindi maaaring mailipat nang sabay.
Upang mapalaganap ang Clematis Tudor sa pamamagitan ng paghahati nito, kailangan mong malaman ang tungkol sa ilang mga patakaran.
- Ang paghihiwalay ng isang halaman na pang-adulto ay dapat maganap sa panahon ng taglagas na transplant. Karaniwan, ang oras na ito ay babagsak sa Setyembre.
- Sa layuning ito, kinakailangang maghukay sa mga palumpong sa paligid ng paligid. Ang talim ng pala na ginagamit mo para sa hangaring ito ay dapat na patalasin nang mabuti upang hindi masaktan ang root system.
- Mula sa mga rhizome, kailangan mong malumanay na kalugin ang lupa, at pagkatapos ay hatiin ang palumpong sa maraming magkakahiwalay na halaman. Ang mga bahaging ito ng pangunahing bush ay dapat magkaroon ng malusog na mga shoot at buds.
- Ang mga punla ay dapat na agad na itinanim sa isang bagong tirahan. Sa kasong ito, ang ugat ng kwelyo ay dapat palalimin.
- Pagkatapos ng pagtatanim, ang zone ng bilog na malapit sa puno ng kahoy ay mahusay na natubigan ng tubig, at isang malts layer ay inilatag sa itaas.

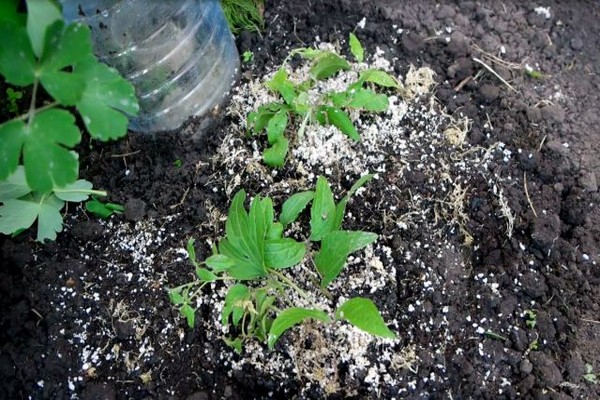
Tulad ng para sa pinagputulan, ang mga segment ay kailangang i-cut sa simula ng tag-init, ang unang kalahati ng Hunyo ay perpekto para sa mga hangaring ito. Ang mga batang tangkay na may isang may istrakturang istraktura ay pinakamahusay na nakaka-root. Ang isang shoot, na pinutol sa antas ng lupa sa tuktok ng usbong, ay maaaring makagawa ng maraming magagandang haba na magkakaroon ng dalawa hanggang tatlong internode. Nag-uugat ang mga pinagputulan, bilang panuntunan, sa mga kondisyon sa greenhouse. Sa parehong oras, ang antas ng kahalumigmigan ay dapat sapat na mataas, at ang temperatura ay dapat mapanatili sa antas na hindi mas mababa sa +23 degree.
Bilang karagdagan sa mga pamamaraan sa paglaganap sa itaas, maaari mong gamitin ang pamamaraang paglaganap gamit ang layering. Marahil ito ang pinakamadaling paraan. Sa pagtatapos na ito, sa tagsibol, kinakailangan upang maghukay ng isang uka malapit sa halaman, ang lalim nito ay dapat na hindi hihigit sa dalawampung sentimetro, at hanggang sa isang metro ang haba. Kailangan mong punan ito ng maayos na lupa na may maluwag na istraktura. Ang humus at vermicompost ay maaaring maidagdag sa lupa. Pagkatapos nito, isang malusog, malakas at sapat na mahabang shoot ay napili, baluktot at umaangkop sa uka. Pagkatapos nito, ibubuhos ang lupa sa itaas. Para sa pagiging maaasahan, kailangan mong i-secure ang shoot gamit ang mga kahoy na tirador. Sa buong tag-init, kailangan mong tubig ang iyong mga pinagputulan, at ilapat din ang mga nutrisyon sa parehong iskedyul tulad ng para sa pangunahing bush. Ang paghihiwalay ng materyal na pagtatanim, na nabuo na ang root system nito, ay nangyayari, bilang isang panuntunan, sa panahon ng tagsibol o taglagas ng susunod na taon. Pagkatapos ang mga halaman ay inilipat sa isang bagong tirahan.

Upang mapalugod ka ng Clematis Tudor sa hitsura nito bawat taon, kailangan mong suriin pana-panahon ang mga halaman para sa mga palatandaan ng sakit o gawain ng mga mapanganib na insekto.
Kabilang sa mga pinaka-mapanganib na mapanganib na insekto na maaaring makapinsala sa clematis ay ang mga slug, aphids, at spider mites. Sa taglamig, ang mga rodent ay may panganib sa mga shoot. Upang maiwasang magtanim ang mga daga, maaari kang gumamit ng iba't ibang mga deterrent. Ang mga slug ay kinokolekta ng kamay, at upang ang mga aphid at spider mites ay hindi makagalit sa iyong mga pagtatanim, maaari mong gamitin ang Fitoverm o iba pang mga espesyal na paghahanda ng insecticidal.
Tulad ng para sa mga sakit na pinagmulan ng fungal, bilang panuntunan, ang clematis ay apektado ng kalawang, kulay-abong mabulok, malanta, pulbos amag. Upang maiwasan ang mga naturang problema na magmula sa iyong mga pagtatanim, kinakailangan na pana-panahong isagawa ang gawaing pang-iwas gamit ang mga fungicidal agents.
Clematis Tudor: mga larawan
clematis Ang Tudor ay hindi masyadong matangkad ng isang halaman na maaaring galak sa bawat taon na may magagandang malalaking inflorescence. Ang pandekorasyon na hitsura ng iba't ibang Tudor ay magagawang palamutihan ang anumang site. Para sa panahon ng taglamig, kinakailangan na gumamit ng isang pantakip na materyal. Sa taglagas, kailangan mong i-trim ang clematis. Ang pangangalaga sa Tudor clematis ay hindi masyadong mahirap, ngunit ang ilang mga patakaran ay dapat sundin. Hindi masama, ang nasabing clematis ay makakaligtas sa mababang temperatura, ay bihirang atake ng mga peste at sakit.