Do-it-yourself greenhouse mula sa isang profile pipe
Nilalaman:
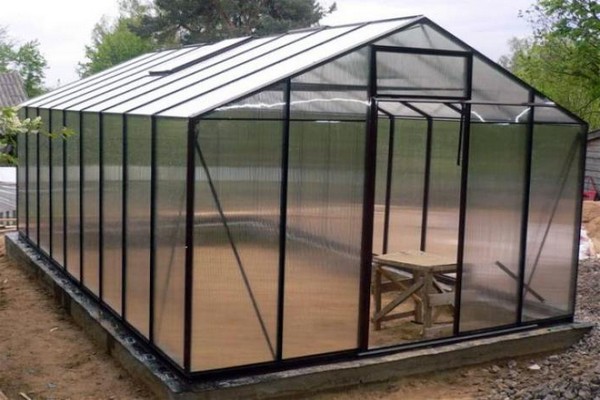
Kung nais mong bumuo ng isang greenhouse o greenhouse sa iyong tag-init na kubo, siyempre, ang tanong ay lumabas: anong materyal ang dapat gamitin? Sa artikulong ito, isasaalang-alang namin ang self-made na konstruksiyon ng isang greenhouse na gawa sa matibay na materyal, katulad mula sa isang profile pipe. Sa tulong nito, posible na gumawa ng isang malakas na frame na maghatid sa iyo ng higit sa isang dekada. Sa mga social network, posible na makahanap ng maraming bilang ng mga rekomendasyon para sa pagtitipon ng gayong istraktura bilang isang greenhouse mula sa mga tubo. Gayunpaman, ang karamihan sa mga manggagawa ay nagpapakilala sa proseso ng pagtatayo mula sa mga tubo, ngunit hindi profile. Sa artikulong ito mahahanap ang impormasyon sa kung paano gumawa ng isang greenhouse mula sa isang tubo gamit ang iyong sariling mga kamay.
Maikling tungkol sa pagtatayo ng isang "greenhouse ng mga tubo"
Kailangan mong malaman na ang profile pipe, hindi katulad ng karaniwang ispesimen, ay may hugis ng isang rektanggulo o parisukat.
Sa kabila ng magaan na timbang, ang materyal na ito ay medyo matibay. Kung inaasahan mong gumawa ng isang arched greenhouse, inirerekumenda namin ang paggamit ng isang kwarenta hanggang dalawampung profile. Para sa mga lintel, inirerekumenda na gumamit ng isang tubo na may sukat na dalawampu't dalawampu.
Ang mga pakinabang ng isang profile pipe ay nakalista sa ibaba:
- nagsilbi nang higit sa isang dosenang taon.
- isang iba't ibang mga pagpipilian sa ibabaw.
- Ang pag-install ay hindi mahirap.
- Ang pangkabit ay hindi mahirap.
- ang kakayahang gumawa ng pagtatayo ng iba't ibang mga numero.
Ang abala lamang ay ang baluktot ng materyal. Sa pagpipiliang ito, kinakailangan upang yumuko nang tama ang tanging tubo, pagkatapos ay ilapat ito bilang isang template. Dapat itong puno ng buhangin nang maaga.
Paggawa ng istrakturang ito
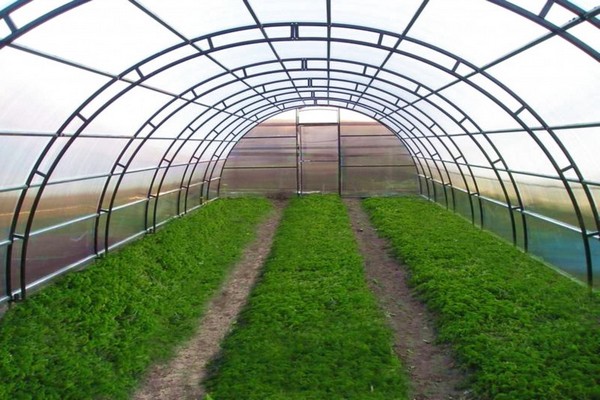
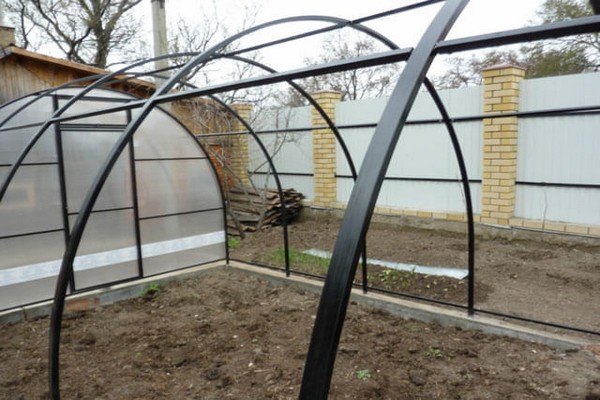
Ang isang pares ng mga bersyon ng mga kulot na greenhouse ay kilala, ngunit naisip naming surbeyin ang pagtatatag ng isang arched greenhouse. Kung mayroong maliit na kasanayan ng mga katulad na proseso, pagkatapos ay hindi dapat magkaroon ng isang malaking halaga ng problema sa pag-install.
Sa proseso ng pagpili ng isang site para sa paglalagay ng isang greenhouse, kinakailangang isaalang-alang ang kinakailangang dami ng ilaw, samakatuwid, ang greenhouse ay dapat na matatagpuan sa timog na bahagi. Ang mga patak sa ibabaw ay hindi dapat lumagpas sa sampung sentimetro.
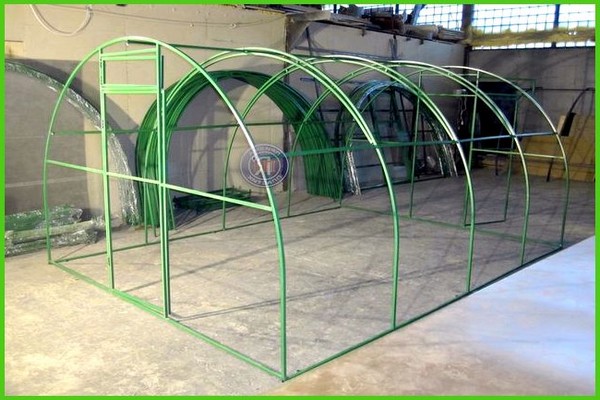
Upang makabuo ng mga arko, kailangan mong bumili ng isang profile na may isang seksyon na sumusukat sa dalawampu't apatnapu, kumuha ng sampung kopya ng isang tubo ng profile nang sabay-sabay. Ang tinatayang haba ng tubo ng profile ay dapat umabot sa limang puntos at walong ikasampu ng isang metro (posible na putulin agad ito sa pagbili, o bumili ng anim na metro na hugis na mga tubo). Upang palamutihan ang mga arko, pinapayuhan na gumamit ng isang tool na tinatawag na "pipe bender", kung gagawin mo ito sa iyong sarili, kung gayon magiging problemado upang makakuha ng malakas na materyal.
Para sa mga jumper ng frame, kinakailangan upang maghanda ng isang profile na may isang seksyon ng dalawampung millimeter ng dalawampung millimeter, bumili ng apatnapung mga kopya nang sabay-sabay. Ang haba ng materyal ay dapat na hanggang animnapung pitong sentimetro.
Gumamit ng mga pusta at matibay na twine upang markahan ang greenhouse na ginagawa. Upang makakuha ng isang antas ng greenhouse, kailangan mong suriin ang mga marka ng dayagonal.
Humukay ng hukay walong pung sentimetrong malalim, pagkatapos ay maglagay ng solusyon dito sa semento, humigit-kumulang sa pinahabang ilalim, ang taas ng nahukay na hukay ay dapat umabot sa labinlimang sent sentimo.
Sa isang bagong antas, ang mga nakahalang base ay hinang sa mga paayon na base. Upang magbigay lakas at lakas, pinapayuhan na gumamit ng mga sulok na gawa sa metal.
Ilagay ang mga brick sa ilalim ng base, kung may pagnanais para sa pagmamason, posible na gumawa ng isang maliit na kanal.
Kaagad bago gawin ang frame, kinakailangan upang ilatag ang mga sheet ng polycarbonate, ilagay ang mga arko sa itaas at balangkas ang mga ito ng isang nadama-tip na panulat. Posibleng putulin ang materyal sa tulong ng isang matalim na kutsilyo sa konstruksyon, habang hindi hinahawakan ang karagdagang espasyo na dalawang sentimetro.

Kapag ang solusyon ay ganap na tumigas, sulit na simulan ang gawaing pag-install mula sa frame ng profile pipe. Kinakailangan na hinangin ang numero ng arko sa pinahabang mga base.
Ito ay nagkakahalaga ng pagbanggit na ang pag-install ng arko sa ilalim ng una at huling mga numero ay itinuturing na pinakamahalagang proseso, samakatuwid pinapayuhan na gumamit ng isang linya ng plumb.
Sa tulong ng mga jumper, ang natitirang mga bahagi ay pinagsama sa pagliko. Pinapayuhan ng mga masters na simulang i-welding ang mga arko sa tuktok ng mga jumper. Pagkatapos nito, i-install ang huling arko, kung gayon kinakailangan upang hinangin ang mga end jumper na gawa sa materyal na profile na may isang seksyon ng laki na dalawampu't dalawampu't, dahil wala silang makabuluhang timbang.
Ang polycarbonate ay nakakabit sa istraktura gamit ang dalubhasang mga self-tapping screw na may mga washer. Kaagad bago mag-sheathing, dapat na alisin ang proteksiyon na patong mula sa mga sheet. Ang unang kopya ay dapat na lampas sa mga hangganan ng istraktura, ng halos labinlimang sentimetro.
Matapos ayusin ang polycarbonate, kinakailangan upang putulin ang mga butas para sa mga bintana at pintuan. Ang lahat ng mga kasukasuan ay dapat na lakarin ng telang may silicone.
Ang tagal ng nagawang istrakturang ito ay umabot ng higit sa sampung taon. Sa parehong oras, ang isang greenhouse na gawa sa mga tubo ay hindi nangangailangan ng anumang teknolohiyang pang-agrikultura.
Pagguhit ng istrakturang ito
Kapag naghahanda ng isang pamamaraan ng istraktura ng greenhouse, kinakailangang isaalang-alang na ang tubo ay may ordinaryong sukat mula tatlo hanggang labindalawang metro. Samakatuwid, kailangan mong tanungin ang nagbebenta para sa maliit na pananarinari na ito. Papayagan ka nitong lumayo mula sa mga hindi kinakailangang gastos at magpatakbo nang hindi kinakailangang pag-trim.
Tandaan! Ang cross-seksyon ng isang tubo mula sa isang profile para sa pangunahing mga elemento ay dapat na dalawampu't apatnapu, at isa pang dalawampu't dalawampu para sa pagkonekta ng mga bahagi.
Posibleng mailapat ang sumusunod na impormasyon sa pagguhit:
- ang pundasyon.
- tungkol sa mga patayong racks.
- tungkol sa istraktura ng bubong.
- tungkol sa itaas na strapping.
- tungkol sa mga pintuan.
- tungkol sa mga bintana.
- tungkol sa mga spacer.
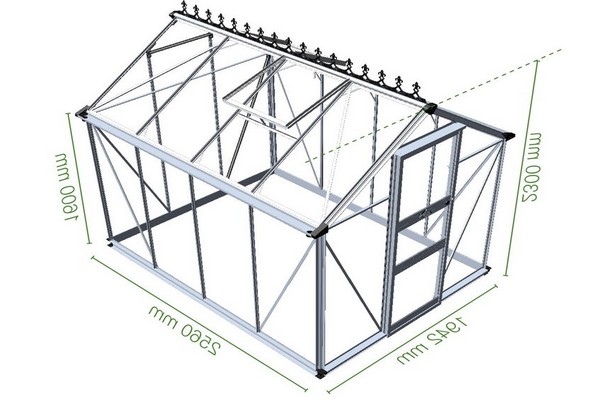
Upang magsimula sa, kailangan mong pumili sa puwang sa pagitan ng mga patayong uprights. Pinapayuhan ng mga masters ang laki ng isang daang sentimetro. Gamit ang pagpipilian kapag ang greenhouse ay dapat na sakop ng siksik na bagay, pagkatapos ang puwang ay maaaring mabawasan sa animnapung sentimetrong. Kinakailangan ito upang mabawasan ang pagkarga sa tubo. Kung kinakailangan upang madagdagan ang puwang, kinakailangan na bumili ng mga bahagi ng auxiliary.
Ang isang iba't ibang paraan ay dapat gamitin upang makagawa ng isang hugis-arko na greenhouse. Sapagkat narito kinakailangan na baluktot nang tama ang tubo mula sa materyal na profile sa tamang anggulo. Kung ipinapalagay na ang taas ng greenhouse ay aabot sa dalawang metro, kung gayon kinakailangan na bumili ng labindalawang-metro na tubo. Ang puwang sa pagitan ng mga arko, pinapayuhan na gumawa ng hindi hihigit sa isang daang sentimetro.
Ang lahat ng mga arko ay naayos sa bawat isa; upang ma-secure ang gusali mula sa lahat ng panig, kinakailangan na gumamit ng mga materyales sa profile. Sa pamilya, banggitin ang mga auxiliary struts sa mga bahagi.
Huwag kalimutan na, kung ninanais, posible na gumawa ng iba't ibang mga bahagi mula sa tubo, samakatuwid ito ay kilala tungkol sa tulad ng isang pagkakataon tulad ng paglikha ng isang sandalan, sa anyo ng isang tatsulok o isang bola para sa isang greenhouse.
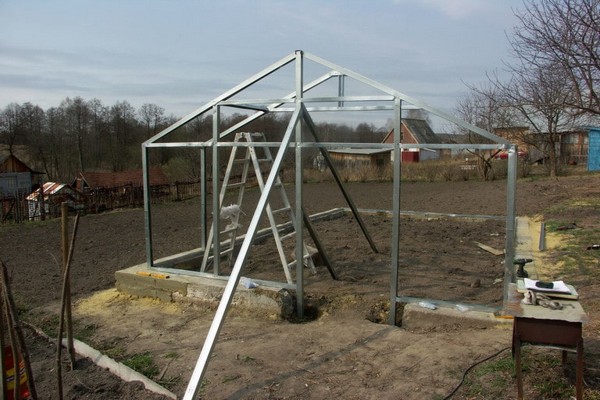
Malamang na napagtanto mo na ang konstruksyon ay magiging mabigat, na nangangahulugang kinakailangan na gumawa ng isang base. Ang pundasyon ay inihanda sa kahilingan ng may-ari ng tag-init na maliit na bahay. Pinapayuhan na agad na ilagay ang angkla sa solusyon sa semento, kung saan ang welding para sa kuta ay hinangin.
Ang isang greenhouse mula sa mga tubo ay tipunin ayon sa sumusunod na alituntunin:
- para sa mga patayong proyekto sa konstruksyon, kinakailangan upang i-cut ang isang tubo mula sa isang materyal na profile ng mga kinakailangang sukat.
- Weldo ang mga patayong post sa base, habang gumagamit ng isang tool na tinatawag na "antas ng gusali".
- sa tuktok ng konstruksyon kinakailangan upang ayusin ang balangkas.
- magsukat at gupitin ang mga detalye para sa mga patayong post.
- pagsamahin at palakasin ang lahat ng mga struts na may mga cross beam.
- gumawa ng isang pintuan at mai-install ito sa nakaplanong lugar.
Ang isang bahagi ng mga residente at magsasaka ng tag-init ay ginusto ang paggawa ng isang frame sa lupa, pagkatapos na ito ay pinalakas sa pundasyon. Upang maiwasan ang mga iregularidad, ang mga prosesong ito ay dapat gawin ng eksklusibo sa isang patag na lugar.
Para sa paggawa ng kamay mga greenhouse sa anyo ng isang arko ng kanilang mga tubo na gawa sa mga hugis na materyales, kinakailangang gumamit ng isang tool na tinatawag na "tubo bender". Sa kawalan nito, ang mga sumusunod na proseso ay dapat gumanap para sa baluktot:
- gupitin ang isang bahagi ng kinakailangang laki.
- upang gumawa ng mga lagari.
- yumuko ang tubo.
Sa pagpipiliang ito, pinapayuhan ang mga artesano na simulang mag-ipon mula sa magkabilang panig. Pinapayagan kang makuha ang kuta ng istraktura.

Kaagad pagkatapos ng pag-install ng frame, kinakailangan upang palakasin ang polycarbonate. Gayunpaman, isang pares ng mga pitfalls ang kilala dito, na nakalista sa ibaba:
- ang tuktok na bahagi ay ang isa na may proteksiyon layer.
- kinakailangan upang ikabit ang mga sheet gamit ang self-tapping screws na may mga rubber cap.
- ang mga sheet ay nakakabit kasama ng mga plato, gawa sa metal.
- isang sealant ay inilapat sa mga kasukasuan.
- pagkatapos palakasin ang materyal, alisin ang proteksiyon na patong.