DIY winter greenhouse
Nilalaman:
Pangarap ng bawat hardinero ng pag-install ng isang winter greenhouse sa kanyang hardin. Pagkatapos ng lahat, pagkatapos ay ang paglilinang ng gulay, prutas at berry na pananim ay naging posible sa lahat ng 12 buwan. Napakamahal na bumuo ng isang winter greenhouse, dahil kinakailangan upang magbigay ng kinakailangang microclimate, na kakailanganin hindi lamang ang pagtatayo mismo ng gusali, ngunit kinakailangan ding mag-install ng thermal insulation. Kinakailangan na mag-install ng mga system na nagpapanatili ng nais na microclimate, magbigay ng elektrisidad at tubig. Sa ibaba ay magbabahagi kami ng impormasyon upang matulungan kang mag-set up ng isang matibay na winter greenhouse na gagawin ang trabaho nito kahit na sa mga lugar na may pinakamahirap na taglamig. Kaya, ano ang isang winter greenhouse at kung paano ito itatayo sa iyong sarili.
Ano ang mga pagkakaiba sa pagitan ng mga greenhouse ng taglamig at tag-init? Ano ang dahilan ng kanilang napakataas na gastos? Ang sagot dito ay maaari lamang isaalang-alang sa pamamagitan ng pagsasaalang-alang sa lahat ng mga proseso na nagaganap sa greenhouse sa panahon ng malamig na panahon.
Winter greenhouse na may pag-init: bakit kinakailangan ito at anong mga pamamaraan ng pag-init ang umiiral
Sa tag-araw ang greenhouse ay pinainit ng mga sinag ng araw. Sa araw, ang lupa at ang istraktura mismo ay pinainit ng araw, habang sa gabi ay nagbibigay ito ng naipong init. Nakakatulong ito upang patatagin ang temperatura, na lumilikha ng isang komportableng kapaligiran para sa mga hortikultural na pananim. Maulap na panahon ay hindi rin negatibong makakaapekto sa mga pananim, dahil sa tag-araw ang mga oras ng araw ay mahaba, na nagpapahintulot sa greenhouse na magpainit nang sapat.
Sa taglamig, lalo na kung ang mga ito ay hilagang latitude, ang mga oras ng liwanag ng araw ay napakaikli at ang araw ay mataas lamang ang pagtaas ng araw sa isang maikling panahon. Ang mga sinag ng araw ay mayroon lamang oras upang gaanong hawakan ang lupa at huwag itong painitin. Sa gabi, ang lupa ay lumalamig at nagyeyelo kapag nagsimula ang mga frost. Ito ay nauugnay sa mga dahilan para sa pangangailangan na magpainit ng mga gusali ng taglamig gamit ang mga sistema ng pag-init.
Ang winterhouse ng taglamig ay maaaring maiinit sa iba't ibang mga paraan. Ang mga kalan, pampainit ng tubig, pampainit ng gas o kuryente ay angkop. Lahat nagmula sa mga hinahangad, kakayahan sa pananalapi at laki ng gusali. Kapag pumipili, ang pangunahing bagay ay upang bigyang pansin ang lakas ng aparato, mahalaga na sapat na upang mapainit ang greenhouse sa mga malamig na buwan.
Winter greenhouse: pagkakabukod
Ang pagpili ng tamang aparato sa pag-init ay mahalaga, ngunit hindi ito magiging epektibo kung ang pagkakabukod ay mahirap. Upang mabawasan ang pagkawala ng init, kinakailangan upang ilibing ang greenhouse sa lupa, magtayo ng mga blangko na insulated na pader, gumamit ng dobleng glazing o polycarbonate 10 mm o higit pang makapal.
Napakahalaga din upang maayos na mai-seal ang mga kasukasuan at basag. Ang mga naka-recess na greenhouse ay may mahusay na mga katangian ng pagkakabukod ng thermal, gayunpaman, mayroon silang ilan sa mga kawalan na nakalista sa ibaba.
Recessed winter greenhouse: kung paano gumawa ng isang frame
Upang makalikha ng mahusay na pagkakabukod ng thermal, kinakailangan upang palalimin ang greenhouse sa lupa upang mapunta ito sa ibaba ng antas ng pagyeyelo ng lupa. Sa mga temperaturang latitude, ang greenhouse ay dapat ibababa sa lalim ng isa't kalahating metro. Sa higit pang mga hilagang latitude, dalawang metro.Upang maihanda ang gayong hukay, higit na mga pamumuhunan sa pananalapi ang kakailanganin.
Para sa ganitong uri ng mga greenhouse, ang mga lugar kung saan matatagpuan ang tubig sa lupa na malapit sa ibabaw ng lupa ay hindi angkop. Kung walang ibang site, kakailanganin mong mag-install ng isang espesyal na system na mangolekta at magtanggal ng tubig sa lupa.
Ang mga pader ng gayong istraktura ay dapat gawin ng de-kalidad na kongkreto na hindi pinapayagan na dumaan ang tubig. Kaya, ang lahat ng trabaho ay nagiging hindi lamang sapat na mahal, ngunit mahirap din upang maisakatuparan ito nang mag-isa.
Winter greenhouse - Pag-install ng DIY
Ang mga materyales tulad ng foam concrete, heat blocks at kahoy ay maaaring magamit upang makabuo ng mga blangko na insulated na pader.
Ang Polyfoam ay magsisilbing isang mahusay na pagkakabukod dito. Madaling mai-install ang materyal na ito, lumalaban sa kahalumigmigan at hindi nabubulok.
Upang ihiwalay ang malamig na hangin mula sa lupa, ang isang insulated blind area ay angkop, ang lapad nito ay hindi dapat mas mababa sa 50 sentimetro.
Mahalagang malaman na ang mga dingding ng greenhouse ay insulated lamang mula sa labas.
Paano mag-insulate ang isang greenhouse basement

Ang sakop ng greenhouse ay napakahalaga rin. Ang patong ay hindi dapat makagambala sa mahusay na paghahatid ng ilaw at mahusay na pagkakabukod ng thermal. Kung ang salamin ay ginagamit para sa istraktura, pagkatapos ito ay dapat na doble o triple, at ang mga puwang sa pagitan ng mga ito ay mula 1 hanggang 3 sentimetro.
Kung ginamit ang polycarbonate, kung gayon kakailanganin ang mga espesyal na profile. Lilikha ito ng pagkakabukod para sa honeycomb sa loob. Makakatulong din ito upang lumikha ng isang selyadong puwang ng hangin na may mahusay na mga katangian ng pagkakabukod ng thermal.
Ang isang layer ay inilatag na may polycarbonate, na ang kapal ay 1-2.5 sentimetro. Kung ang kapal ay hindi hihigit sa 0.6 sentimetro, pagkatapos ay inilalagay ito sa dalawang mga layer.
Mahalagang malaman na ang pelikula ay ginagamit para sa mga winter greenhouse lamang sa mga lugar kung saan napakabihirang ng snowfall. Kung mayroong maraming niyebe, ang pelikula ay mabatak at masisira.
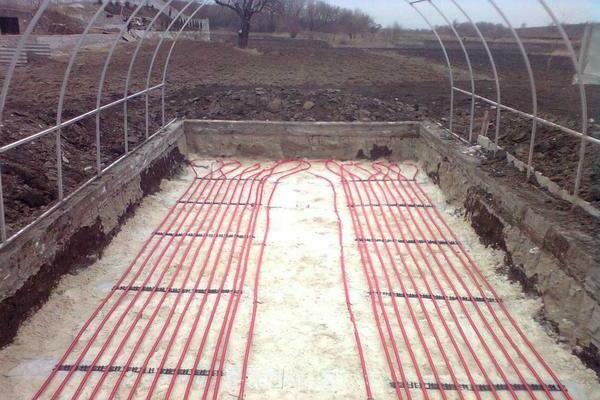
Paano i-water ang mga halaman at kung ano ang mai-install para dito

Upang ang mga halaman ay tumubo nang maayos, bumuo at mamunga, kailangan nila ng sapat na dami ng tubig. Kung ang greenhouse ay may malaking lugar, kakailanganin mong gumamit ng maraming tubig. Samakatuwid, kapag inilalagay ang pundasyon, kailangan mong mag-isip tungkol sa isang mapagkukunan na nagbibigay ng mga halaman na may likido.
Kung balak mong ikonekta ang mga tubo sa isang sistema ng suplay ng tubig o isang balon, dapat silang lumalim nang sapat sa ilalim ng lupa. Kung ang pagtula ay nagaganap sa timog ng bansa, pagkatapos ay dapat silang pumunta sa ilalim ng lupa sa lalim ng 100 sentimetro, kung sa hilaga, pagkatapos ay hindi bababa sa 1.8 metro. Kung ang greenhouse ay sumasakop sa isang malaking lugar at nagsisilbi para sa paggawa ng mga pananim sa isang pang-industriya na sukat, magiging mas kapaki-pakinabang na i-cut ang isang balon malapit sa greenhouse.
Upang maiinit ang tubig, ang mga tanke ay angkop, na ang dami ay mula 0.2 hanggang 1 metro kubiko. Dapat silang mai-install sa isang maliit na burol upang lumikha ng kinakailangang presyon para sa mga sistema ng patubig. Upang hindi lumikha ng isang anino para sa mga kultura, kinakailangan upang ilagay ang mga ito sa hilagang bahagi. Ang tubig ay pinainit ng araw. Maaari ka ring gumawa ng artipisyal na pag-init gamit ang mga elemento ng pag-init.
Mahalagang malaman na ang lalagyan kung saan matatagpuan ang tubig ay nagsisilbing isang mahusay na nagtitipon ng init. Pinainit sa araw, ibinabahagi nito ang init nito, unti-unting lumalamig sa gabi. At binabawasan nito ang pagtaas ng temperatura.
Winter greenhouse at bentilasyon
Para matagumpay na lumago ang mga halaman, kailangan nila ng bentilasyon. Salamat sa kanya, ang mga halaman ay maaaring makatanggap ng kinakailangang dami ng oxygen, at ang sobrang init at kahalumigmigan ay mawawala. Upang likhain ang mga kundisyong ito, kinakailangan upang mag-install ng mga system na responsable para sa natural at sapilitang bentilasyon.
Talaga, upang ang silid ay maaaring ma-ventilate, ang mga lagusan ay ginawa. Ang kanilang pag-install ay dapat na nasa tuktok ng mga dingding o sa bubong. Sa pamamagitan ng pag-install ng window sa tuktok, posible na magbigay ng pinakamahusay na bentilasyon. Ang maligamgam na hangin na umaangat ay magbabago ng mga lugar na may papasok na sariwang hangin. Maaari silang magawa kapwa awtomatiko at manu-mano.
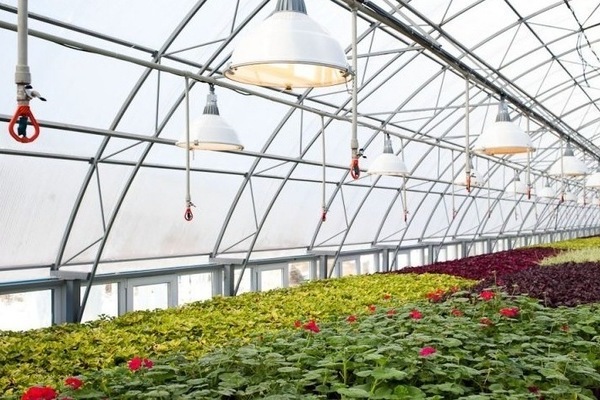
Paano gumawa ng isang winter greenhouse: pag-iilaw

Sa tag-araw, ang karamihan sa mga halaman ay may sapat na ilaw na natural na ibinibigay sa kanila. Sa taglamig, walang sapat na natural na ilaw at ang karagdagang pag-iilaw ay dapat na konektado. Upang magawa ito, posible na gumamit ng mga lampara na nagcha-charge ng gas na DNAT at DNAZ.
Ang dami ng ilaw na ibibigay sa artipisyal na ilaw ay nakasalalay sa mga pagkakaiba-iba na lumago sa greenhouse. Sa pag-iisip na ito, na-install ang kinakailangang bilang ng mga lampara. Talaga, ang pagkalkula ng kabuuang lakas ng mga lampara ay tapos na isinasaalang-alang ang lugar.
Upang maipaliwanag ang isang square meter, isang lakas na 100 watts ay sapat. Kung ang lugar ay dalawampung parisukat metro, kung gayon kinakailangan ng hindi bababa sa 2000 W, ibig sabihin 5 HPS lampara na may lakas na 400 watts. Bilang karagdagan, kakailanganin na gamitin ang mga panimulang kagamitan.
Mahalagang malaman na ang mga lampara ng DNAT at DNAZ ay napakainit. Samakatuwid, upang magamit ang mga ito, kakailanganin mong gumamit ng mga espesyal na lampara na sumasalamin ng ilaw, i-install ang mga ito sa kisame.
Paano bumuo ng isang winter greenhouse at makatipid ng pera
Kung plano mong palaguin ang mga hortikultural na pananim sa isang pang-industriya na sukat sa isang greenhouse, ang lugar na kung saan ay halos 100 square meter, kung gayon mas mahusay na mag-order ito mula sa isang kumpanya.
Sa pagmamanupaktura ng mga halaman, makakagawa ka ng kumpletong kagamitan na mga greenhouse ng taglamig ng isang pang-agrikultura o uri ng pag-block kung saan naka-install na ang awtomatikong pagpainit, pagtutubig at bentilasyon.
Ang nasabing pagpipilian ay mangangailangan ng mas kaunting mga gastos sa pananalapi at sa parehong oras ang mga ito ay lubos na angkop para sa mga mekanisadong aparato na gumaganap ng pagpapanatili.
Pagpili ng isang lugar kung saan matatagpuan ang winter greenhouse
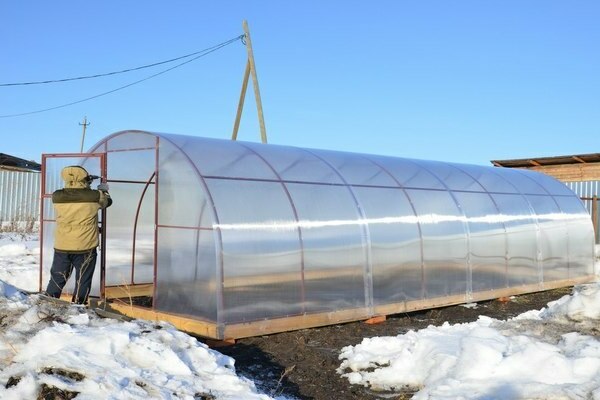
Ang isang maliit na greenhouse ng taglamig, kung saan pinaplano na itanim ang mga gulay o iba pang mga pananim para sa pagkonsumo sa bahay, ay maaaring itayo nang mag-isa.
Upang magawa ito, kailangan mo munang pumili ng angkop na lugar para sa, magpasya sa hugis at laki. At iguhit ang isang diagram kung saan makikita kung saan matatagpuan ang mga kama, pagpainit, irigasyon at mga sistema ng bentilasyon. Kakailanganin din upang makalkula ang gastos ng lahat ng mga materyal na kakailanganin.
Ang winter greenhouse ay dapat na mai-install sa isang lugar na may mahusay na ilaw at proteksyon mula sa malamig na hangin. Maaari itong ikabit sa garahe, labas ng bahay at sa bahay, pinakamahalaga sa maaraw na bahagi.
Kung ikinabit mo nang hiwalay ang greenhouse, pagkatapos ay dapat itong gawin sa direksyon mula sa hilaga hanggang timog, na tinatatakan ang pader mula sa hilaga gamit ang mga insulated na materyales o paglikha ng isang uri ng dressing room doon.
Pagtatayo ng greenhouse
Ang isang mas simple at mas maaasahan, na may mahusay na pagkakabukod ng thermal, ay magiging isang tuwid na pader na istraktura, kung saan ang foam concrete na may pagkakabukod ay nagsisilbing isang materyal para sa pagtataguyod ng mga pangunahing pader. Sa dulo sa timog na bahagi ng dingding, dapat itong itahi ng isang dobleng layer ng polycarbonate. Ang dressing room, na ginawa sa hilagang bahagi, ay magsisilbing proteksyon sa panahon ng bagyo. At doon din maaari kang mag-install ng silid ng boiler at isang bodega para sa mga tool at iba pang kagamitan.
Sa tulong ng pinatibay na polycarbonate, ang mga slope ng greenhouse ay dapat na itahi. Sa pamamagitan ng paglikha ng isang sumusuporta sa bahagi ng kahoy, maaari mong ganap na ibukod ang pagtagos ng malamig.
Paghahanda ng isang plano sa pagkilos
Para sa isang pitong metro na greenhouse ang haba at tatlong metro ang lapad, kakailanganin mong i-install ang pundasyon:
- kongkreto 3.6 metro kubiko,
- 100 metro ng 10 mm na pampalakas,
- 130 metro 0.6 sentimetro ng pampalakas,
- 1 metro kubiko ng gupit na 25 mm formwork board,
- 179 na mga PC foam blocks blocks na may sukat na 200 mm x 300 mm x 600 mm,
- 9 dalawampu't limang kilo na mga bag ng masonry na pandikit,
- 3.3 metro kubiko 10 mm polystyrene S,
- 0.5 metro kubiko ng laki ng board 40 x 150 mm para sa mga rafters,
- 5 sheet ng polycarbonate, ang kapal nito ay 10 o 16 mm,
- 15 pcs. end profile L = 210 cm,
- 2 pcs. ridge profile L = 6 m,
- 12 pcs. pagkonekta sa profile L = 6 m,
- 200 pcs. mga tornilyo sa sarili na may isang thermal washer.
Mahalagang malaman na tatagal ng halos isang buwan at kalahati upang makabuo ng isang greenhouse. Sa parehong oras, ang pagpapatayo ng pundasyon ay tumatagal ng tungkol sa 4 na linggo sa isang temperatura sa labas ng hindi bababa sa + 15 degree.
Paglalagay ng pundasyon
Kung ang cellular kongkreto ay ginagamit sa trabaho, kung gayon ang base ay dapat na malakas. Ang isang mahusay na pagpipilian ay ang paggamit ng reinforced concrete para sa isang mababaw na pundasyon ng strip.
Kakailanganin ang pundasyon kapwa upang ipahiwatig ang mga hangganan ng greenhouse, at upang ipahiwatig ang lokasyon ng mga capital partition sa pagitan ng vestibule at ng silid para sa mga lumalagong halaman.
Pamamaraan
Kinakailangan upang markahan at limasin ang lupa. Alisin ang lahat ng mga labi at damo mula sa lugar at gawin itong antas. Gumawa ng isang pagmamarka para sa laki ng greenhouse, gamit ang mga pusta at ikid para dito. Pagkatapos ang mga marka ay ginawa para sa pundasyon.
Upang magawa ito, kailangan mong mag-install ng mga bar o board kung saan naroon ang mga sulok ng istraktura. Ang isang string ay nakakabit sa kanila at iniunat sa buong perimeter. Ang lahat ng mga sulok ay dapat na patayo sa bawat isa, at ang mga diagonal ay dapat na pantay. Ang mga contour ng pundasyon sa labas at sa loob ay minarkahan ng twine.
Ang isang trintsera ay hinukay sa lalim na 50 sentimetro alinsunod sa mga marka. Ang isang halo na gawa sa durog na bato at buhangin ay inilalagay sa ilalim, na mahusay na siksik. Susunod, kailangan mong i-install ang formwork.
Upang gawin ang mga ito, kailangan mong kumuha ng isang 25 mm na talim board. Sa kaso ng isang mabibigat na lupa na may mataas na density, ang formwork ay inilalagay ng eksklusibo sa itaas ng lupa. Kung ang lupa ay magaan, pagkatapos ito ay naka-install sa ilalim ng trench.
Dagdag dito, isang ipinag-uutos na pagpapatibay ng pundasyon ay isinasagawa upang, dahil sa pana-panahong paggalaw ng mundo, ang foam concrete masonry ay hindi pumutok. Ang pampalakas na marka ng 10-A-III (A 400) GOST 5781-82 ay angkop para sa paggawa ng paayon na pampalakas ng tape. Ang pampalakas na grado 6-A-I (A240) GOST 5781-82 ay makakatulong upang makagawa ng mga nakahalang screed. Ang Annealed wire ay ginagamit para sa tinali ng pampalakas sa mga intersection. Ang pagpapalakas ng sulok ay nangangailangan ng espesyal na pansin.
Susunod, ang pundasyon ay ibinuhos ng kongkreto. Ang mga sukat sa itaas ay mangangailangan ng 3.6 cubic meter ng kongkreto. Ang ilang mga tao ay pinaghahalo ang kongkreto mismo. Ngunit hindi lamang ito napakahaba at sapat na mahirap, maaari itong humantong sa isang pagbawas sa lakas ng pundasyon sa panahon ng pagbuhos ng layer-by-layer.
Pinapayuhan ng mga propesyonal sa konstruksyon na mag-order ng handa nang materyal. Ang kongkreto ay ibinuhos sa handa na formwork, itinulak sa pamamagitan ng isang tungkod o vibroshlag, pagkatapos na ang ibabaw ay leveled.
Susunod, kailangan mong maghintay para sa mature na kongkreto. Ang panahong ito ay nangyayari depende sa temperatura ng rehimen. Ang pinaka-pinakamainam na mga kundisyon ay itinuturing na temperatura mula +18 hanggang +20 degree. Sa ilalim ng mga kundisyong ito, pagkatapos ng dalawa o tatlong linggo, ang kongkreto ay magiging sapat na malakas upang ipagpatuloy ang pagtatayo. Kung ang temperatura ay naiiba, pagkatapos ay dapat kang maghintay ng halos isang buwan bago magpatuloy sa karagdagang trabaho.
Upang mapanatili ang patuloy na kahalumigmigan, takpan ang kongkreto ng polyethylene sa panahon ng pagpapatayo. Kapag ang tuktok na layer ng kongkreto ay natuyo, dapat itong mabasa ng tubig. Ang oras kung saan ang lakas ng kongkreto ay nakasalalay sa temperatura.
Mahalagang malaman na ang formwork ay tinanggal pagkatapos ng isang linggo, at ang mga board mula dito ay maaaring magamit nang higit sa isang beses.
Mga foam concrete wall
Kapag inilatag ang mga aerated concrete block, inirerekumenda ang paggamit ng espesyal na pandikit. Papayagan nito ang pinakamaliit na kapal ng mga kasukasuan, na makabuluhang mabawasan ang pagkawala ng init. Kung inilalagay mo ang mga bloke sa isang mortar ng semento, kinakailangan upang magdagdag ng insulate at plaster ng mga dingding.
Ang unang bagay na dapat gawin ay hindi tinatagusan ng tubig. Upang magawa ito, kakailanganin mo ang mga materyales sa pag-roll sa anyo ng materyal na pang-atip, bicrystal o kanilang mga analogue.
Matapos ang pundasyon ay ganap na matuyo, kinakailangan na maglagay ng solusyon ng buhangin at semento dito sa mga proporsyon na 4 hanggang 1. Dapat itong ikalat sa isang manipis na layer. Susunod, ang roll waterproofing ay inilatag upang ang overlap ay nasa mga kasukasuan. Pagkatapos nito, ang ibabaw ay na-level sa isang riles o antas.
Ang pangalawang bagay na dapat gawin ay ang pagtula ng unang hilera. Para sa mga ito, ang mga bloke ng bula ay inilalagay sa isang solusyon ng buhangin at semento sa tuktok ng waterproofing. Kapag inilalapat ang solusyon, kinakailangan na mag-iwan ng isang margin, ang labis ay maaaring alisin pagkatapos na mai-install ang mga bloke.
Para sa pagtula sa mga susunod na hilera, ginagamit ang espesyal na pandikit. Ito ay inilapat sa isang notched trowel saanman ang mga ibabaw ay nagtagpo, parehong pahalang at patayo.
Para sa isang masikip na fit, isang goma martilyo ang ginagamit, gaanong pag-tap sa kung saan, isinasagawa ang gawaing ito. Ang mga hilera ay inilalagay na may bendahe sa kalahati ng bloke.
Susunod, kailangan mong palakasin ang pagmamason. Para sa mga ito, ginagamit ang isang welded masonry mesh, ang proseso ay nagaganap sa bawat segundo o pangatlong hilera. Kung ang pader ay isa at kalahating metro, at ang mga bloke ay may taas na 30 sentimetro, kung gayon ang pagmamason ay dapat na limang hilera. Kaya, ang nagpapatibay na mata ay maaaring magsinungaling sa pagitan ng pangatlo at ikaapat na mga hilera.
Ang pandikit ay inilapat sa tuktok ng mata, at pagkatapos ay naka-install ang bloke. Ang masonerya ay maaaring mapalakas gamit ang mga rod ng pampalakas na inilalagay sa mga blokang groove.
Para sa mga pintuan, ang mga bloke ay pinutol sa laki. Napakadali nilang i-cut gamit ang isang hacksaw; dapat silang gawin ayon sa template.
Kasama sa susunod na yugto ang pagkakabukod ng pader. Ginagawa ito mula sa labas gamit ang mga sheet ng polystyrene. Ang pagkakabukod ay maaaring may iba't ibang mga kapal, ang lahat ay nakasalalay sa rehiyon kung saan naka-install ang greenhouse. Maaari itong mula sa 3 sentimetro hanggang 15.
Para sa mga timog na rehiyon ng bansa, ginagamit ang polystyrene na may kapal na 3 o 4 na sentimetro. Sa teritoryo ng rehiyon ng Volga, kung ito ay Volgograd o Saratov -4 o 5 sentimetro. At kung ang Ulyanovsk, Nizhny Novgorod, Kazan o Izhevsk, kung gayon ang polystyrene ay dapat na 5 o 6 sentimetrong kapal. Sa Gitnang Russia - 6-7 sentimetro, sa Hilagang-Kanluran - 7-7 sentimetri. Sa teritoryo ng Vladivostok at Khabarovsk - 7-8 sentimetro, sa mga Ural - 7-9 sent sentimo. Sa Siberia, ang kapal ng polystyrene ay dapat na tungkol sa 10 sentimetro.
Matapos ang mga pader ay insulated, dapat silang matapos. Para sa mga ito, ang mga materyales na lumalaban sa kahalumigmigan ay angkop. Maaari itong magamit brick, siding, o plaster. Mapapabuti ng pagtatapos ang hitsura ng greenhouse at magbibigay ng karagdagang proteksyon ng hangin at thermal insulation.
Mahalagang malaman na ang foam at polyurethane ay maaaring gamitin sa halip na polystyrene. Hindi nagkakahalaga ng paggamit ng mineral wool, dahil magkakaroon ng maraming halumigmig sa silid.
Decking sa rafters
Para sa paggawa ng mga racks ng troso na nagkokonekta sa mga racks at ng mga tindig na sistema ng bubong, ginagamit ang mga kahoy na board na may sukat na 4 ng 10 sent sentimo. Ang mga rafter ay naka-install sa layo na 50 sentimetro mula sa bawat isa.
Upang gawin ito, sa dingding mula sa timog, ang unang layer ng board ay inilalagay sa tuktok ng waterproofing at naka-attach sa mga fastener, tulad ng isang anchor, sa pundasyon. Gamit ang mga anchor, ang mga post sa gilid na gawa sa mga board ay nakakabit sa foam concrete masonry. Ang pang-itaas na harness at mga intermediate na suporta ay nakakabit sa mga sulok na bakal o mga tornilyo na self-tapping.
Pagkatapos nito, ang tuktok na layer ng board ay naayos na may mga anchor, na inilalagay sa mga pader ng bloke kasama ang buong perimeter. Ang mga ito ay nakakabit sa layo na 60 sentimetro. Ito ay kinakailangan upang ipamahagi ang bigat sa buong pader. Kung ilalagay mo ito nang direkta sa mga bloke, kung gayon ang pagkarga ay magiging pointwise at magiging sanhi ito ng pagkasira ng foam concrete.
Upang ikabit ang mga rafter, dapat na ma-secure ang tuktok na bar. Upang gawin ito, ang mga racks ay kailangang nakasentro sa tuktok na layer ng mga tabla sa mga dingding na tumatakbo sa buong gusali. Ang mga ito ay naayos na may mga sulok at self-tapping screws, pagkatapos kung saan naka-install ang mga dayagonal stick (brace).
Upang mapagsama ang ridge beam, kailangan mong i-fasten ang dalawang board na may sukat na 40 hanggang 100 mm sa magkabilang panig ng mga racks.
Upang makagawa ng mga rafters, kailangan mo ng 40 x 10 mm board. Inilapat ito sa tuktok na bar at sa tuktok na layer ng board sa paayon na dingding. Doon, sa tulong ng isang lapis, ang lugar kung saan gagawin ang gash ay minarkahan. Susunod, gash ay ginanap, isang sinag ay sinubukan, kung saan ang buong crate ay mai-attach (tinatawag din na isang rafter leg) at lahat ng hindi kinakailangan ay itinulak. Ang bawat pares ng naturang mga beam ay konektado sa pamamagitan ng mga plate ng metal sa itaas na crossbar.At ang mga sulok at turnilyo din ay nakakabit sa itaas na crossbar at sa itaas na layer ng mga board.
Upang mag-sheathe ng mga dingding na may polycarbonate, sapat na upang ilakip ito sa isang layer. Kung ang kapal nito ay mula 1 hanggang 2.5 sentimetro, maaari kang lumikha ng isang mahusay na proteksyon laban sa pagkawala ng init. Ang cladding ay nagsisimula sa dulo ng pader sa timog. Ang pagputol ng polycarbonate ay tapos na sa laki sa dingding, upang ang mga tadyang ay nasa isang patayong posisyon.
Ang materyal na pagkakabukod para sa itaas na pagbawas sa polycarbonate ay aluminyo na adhesive tape. Ang mga mas mababang seksyon ay insulated ng butas na butas. Ang mga hiwa ay sarado gamit ang end profile. Upang ayusin ang polycarbonate, ginagamit ang mga tornilyo sa sarili at mga thermal washer. Ang pader mula sa hilaga at ang isa na naghihiwalay sa vestibule mula sa greenhouse ay nakabitin sa katulad na paraan.
Sa tulong ng pagkonekta ng mga profile, ang mga sheet ay konektado sa slope ng greenhouse. Ang isang isang piraso na profile ay magiging sapat para sa 10 mm polycarbonate, at para sa isang mas makapal, kakailanganin mong gumamit ng isang split aluminyo na profile na may isang selyo. Upang mapanatili ng polycarbonate ang integridad nito, dapat itong i-fasten sa pamamagitan ng profile.
Ginagamit ang butas-butas na mga strip at end profile para sa pagproseso ng mas mababang mga dulo ng sheet. Ang isang ridge profile ay kumokonekta sa itaas na mga dalisdis.
Mahalagang tandaan na pagkatapos makumpleto ang pag-install, ang lahat ng mga puwang ay tinatakan gamit ang polyurethane foam o isang frost-resistant sealant ang ginamit.
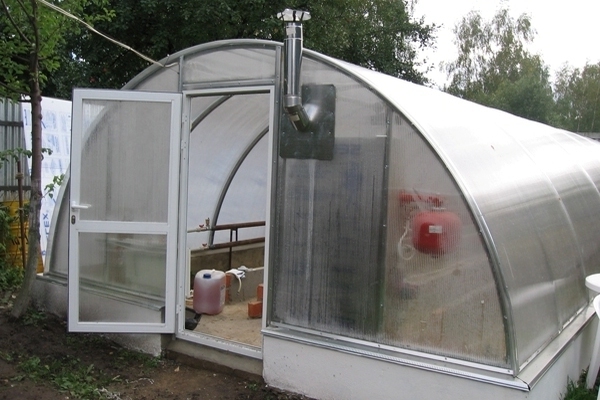
Winter greenhouse: pag-install ng pinto
Ang disenyo na inilarawan dito ay nagbibigay ng dalawang pinto sa istraktura. Pinaghihiwalay ng isa ang vestibule mula sa greenhouse, ang iba pa ay pinaghihiwalay ang kalye mula sa vestibule. Ang isa na humahantong sa kalye ay insulated ng thermoplastic polymer o iba pang mga materyales.
Para sa pintuan sa pagitan ng dressing room at ng pangunahing silid, maaari mong gamitin ang polycarbonate at i-install ito sa isang kahoy na frame. Ang frame ng pinto ay na-secure na may 10 cm na mga anchor. Ito ay ipinasok sa mga bisagra at ang mga naka-lock na aparato sa anyo ng mga kandado ay naka-install dito.
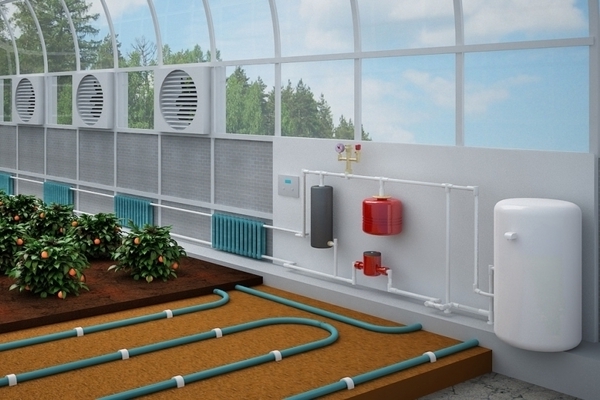
Bersyon ng taglamig ng greenhouse. Gumagawa kami ng isang sistema ng pag-init
Ang greenhouse ay nilagyan ng sistema ng pag-init na iyong pinili. Maaari itong maging isang boiler at isang radiator system.
Kung ito ay isang boiler, kung gayon ang isang vestibule ay perpekto para sa pag-install nito, at ang tsimenea nito ay ilalabas sa kalye.
Kung ang isang sistema ng radiator ay napili, pagkatapos ay para sa isang greenhouse na laki na aming isinasaalang-alang, sapat na upang ayusin ang mga ito sa mga dingding.
Patubig na patubig para sa greenhouse
Ang mga patak na patubig na aparato ay perpekto para sa pagtutubig ng mga halaman sa isang winter greenhouse. Ang tanke ay maaaring ilagay sa vestibule at nilagyan ng isang sistema na responsable para sa pagpainit ng tubig. Ang butas-butas na hoses ay ibinibigay sa mga halaman sa mga kama. Kung ang mga halaman ay nasa racks, ang mga droppers ay angkop para sa kanila.
Paano magsagawa ng pag-iilaw
Ang pag-iilaw ay ginagawa sa pamamagitan ng paglalagay ng mga lampara sa kisame, na ibinigay na ang ilan sa mga ito ay maaaring maging napakainit at maaari itong makapinsala sa polycarbonate.
Upang madagdagan ang pag-iilaw ng silid, kinakailangan na gumamit ng mga sumasalamin na luminaire.
Ang lahat ng mga wire na de-kuryente ay inililipat sa pamamagitan ng mga corrugated na plastik o metal na mga tubo at nakakabit sa greenhouse.
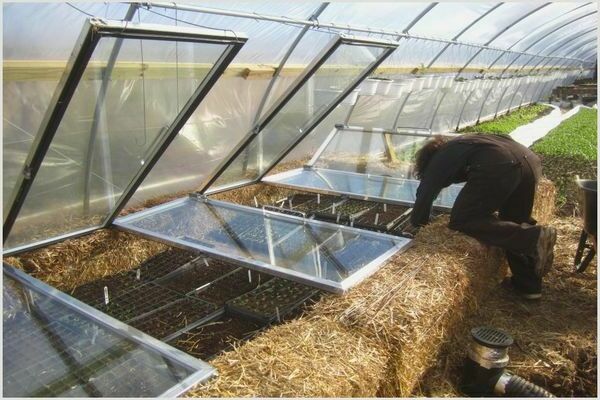
Sa greenhouse, maaari kang gumawa ng mga kama, pati na rin bigyan ito ng mga racks.
Sa mga rehiyon kung saan ito malamig lalo na, ang mga kama ay inilalagay gamit ang teknolohiya ng biological, electric o pagpainit ng tubig. Sa timog ng bansa, ang lupa ay maaaring mabisang mainit ng araw. Sapat na ito upang manahi ang pangunahing mga dingding ng istraktura na may sumasalamin na mga materyales. Bilang karagdagan sa init, ang mga halaman ay makakatanggap ng dalawang beses na mas maraming ilaw.
Kinalabasan
Ang pagkakaroon ng pag-install ng isang winter greenhouse sa iyong site, maaari kang magtanim ng gulay o iba pang mga pananim doon sa buong taon. Maaari rin itong gumawa ng isang magandang greenhouse na magpapasaya sa mata sa buong taon o sa taglamig lamang. Maaari kang magtanim ng mga strawberry, kabute o bulaklak dito at ibenta ang mga ito. Maraming mga pagpipilian para sa kung ano ang gagamitin ang greenhouse, kailangan mo lamang ang iyong imahinasyon at pagnanasa.